
To implement effective digital marketing actions, it’s essential to understand your visitors’ behavior. Whether you have an e-commerce site, a blog or a training platform, every click, every scroll and every user interaction provides valuable information.
The tagging plan is the means of analyzing your visitors’ behavior. It enables us to track each of their actions, with their consent, transforming them into usable data.
In this article, we’ll take a look at the 6 main steps involved in deploying a tagging plan.
Step 1: Start with your business objectives, not with technology
Before diving into the technical aspects, take the time to clearly define what you want to achieve. Too many companies start by installing Google Analytics and then wonder what to do with it.
The idea here is to ask the right questions: what are our objectives? What are our KPIs (Key Performance Indicators) and what do we want to achieve? Get more registrations for a training course? Get more calls to a given telephone number?
Once the objectives have been identified, we’ll observe how users navigate the site. As a first step, we can call on colleagues and gather their feedback in a table to analyze how the site is progressing towards this objective, number of clicks, number of pages, etc.
Step 2: Create your inventory of priority events
Once we’ve defined our objectives in step 1, we’ll list the events we want to measure. Be careful not to fall into the trap of tracking everything! We only need to focus on interactions that are important. Not every link on the website is necessarily part of a business issue.
Here are a few examples to inspire you:
Conversion actions: Click on a firmation (click-training-popular), Validate a form (form-contact-submitted), Subscribe to a newsletter (newsletter-signup)
Engagement : Launch a video (video-formation-played), Download a document (document-downloaded), View a training session (formation-viewed)
Navigation : Search-formation, Filter-applied, Page-scrolled
The idea here is to define a convention for structuring the event with a logical and meaningful codification: [action]-[element]-[context]. Think of maintenance: when you read the event, you must be able to understand its origin.
Step 3: Master the DataLayer
The Datalayer stage is the most important, centralizing all our data in a clean, structured JavaScript object. Instead of letting Google Tag Manager look for information in the HTML, we’re going to prepare the information it needs to use.
Here’s how we implement click tracking on “Popular courses” with the DataLayer :
Concrete example of a DataLayer implementation
function clickTopFormations(dataLayer) {

const formations = document.querySelectorAll('.block-views-blockformation-populaire-block-1 .topFormations .views-row a');

  formations.forEach(formation => {

  formation.addEventListener('click', () => {

  dataLayer.push({

  event: 'click-formation-populaire',

  formation_title: formation.querySelector('.formation-title')?.innerText

  });

  });

  });

}
This function illustrates one approach to tracking. In our case, we want to track all clicks on courses classified under “Popular courses”.
The advantage? If you change the design tomorrow, your tracking will continue to work. Provided, of course, that you keep the same DataLayer structure.
Step 4: Configure Google Tag Manager
Once your DataLayer is in place, we’ll configure Google Tag Manager.
In concrete terms, Google Tag Manager relies on 3 fundamental elements:
✅ Variables are often used to retrieve dynamic data (this could be a product ID or even GA, the name of a submitted form, or the total of a shopping cart).
✅ Triggers, which we configure to tell us when to launch an action. Has a page element been clicked? Has a form been sent? Here we send an event to the DataLayer.
✅ Beacons, like the Google Analytics tag, the Facebook pixel or the Google Ads conversion tracker, send information to your analysis or advertising tools.
Step 5: Test, test and test again…
With Google Tag Manager, we have the option of using the preview mode, a step that is often overlooked, but allows us to check that everything is working. Even if you use console.log in JavaScript, there’s no such thing as 0 risk.
Activate GTM’s preview mode to see what’s happening in real time. Click on your popular courses and check that :
- Triggers activate at the right time
- Variables get the right values
- Tags are triggered to the right destinations
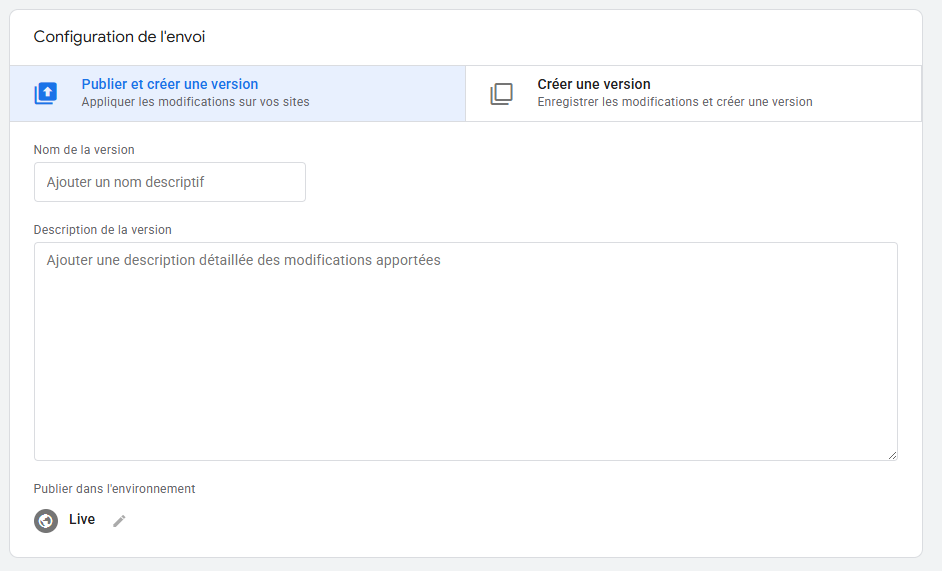
Step 6: Deploy and stay vigilant
Once the test phase has been completed in preview mode, you can publish the version. Don’t forget to define the version name and description. In the event of an error, this will enable you to rollback to a previous, clearly identified version.
Conclusion
Setting up a tagging plan requires a great deal of knowledge: defining objectives, setting up the tagging plan and knowing the datalayer are all elements that require significant investment. The idea of this plan is above all to achieve results and improve performance through adjustments and KPI feedback. With Lukla Group, you’ll benefit from comprehensive support, from defining objectives to implementation, so you can fully exploit the power of your data.